How To Make Newspaper Seed Pots

March 25th, 2009 - filed under: The Farm » Flora

img_9738


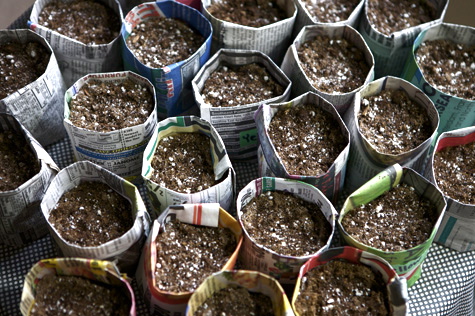
Okay, this is my new favorite project.  I’m so excited to share it with you!  It’s easy, it’s practical, and it’s just so very Earth-friendly.  ¡Qué bueno!

Fellow farmers, this is hands-down the best way to start your spring seeds indoors. These individual containers are the perfect size for a sprout, and come garden time, there’s no stressful transplanting.  When the seedling is ready for the outside, simply open up the bottom of the newspaper pot and drop the entire thing into the ground.  There’s no plastic containers involved, the newspaper will biodegrade in your garden, and your wee plant will never be uprooted.  So, ready to get folding? You’ll need a stack of newspaper and a standard soup can.  Here’s what you do:
 

img_9699

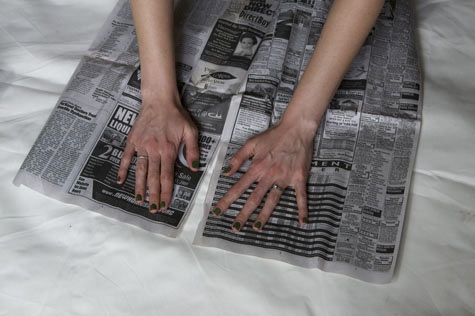
Spread out a full sheet of newspaper and then carefully split it in half, along the crease.


img_9704

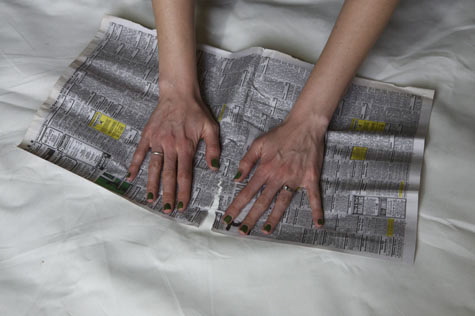
Take one of the halves and carefully split it in half again, along the other crease. You will end up with one quarter of a whole newspaper sheet.


img_9706

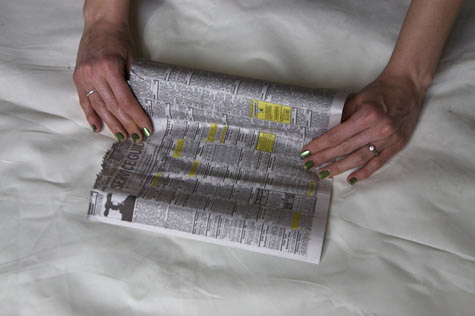
Orient your sheet so that it is taller than it is wide, and then fold the bottom edge up to the top.


img_9708

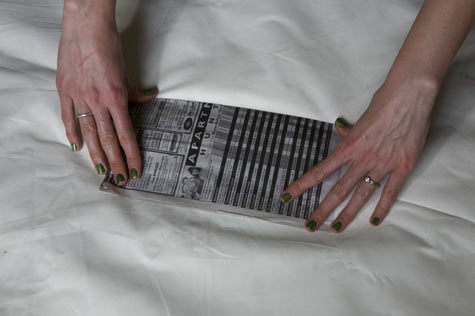
Your sheet has now been folded in half to make a rectangle. Press along the bottom to make a tight crease.


img_9710

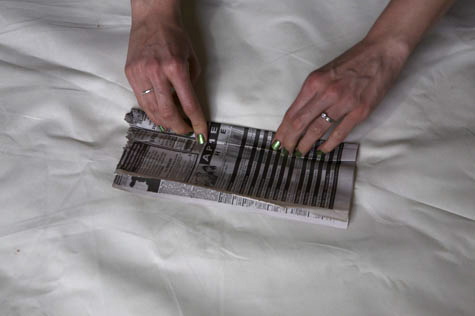
Along the bottom of the rectangle, fold the creased edge over about an inch to make a small flap. Press along the edge to make it nice and tight.


img_9711

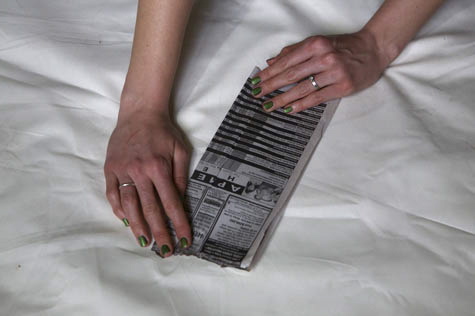
Turn the paper so that it is now facing you lengthwise.


img_9713

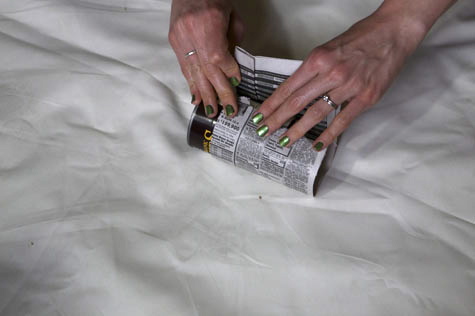
Lay your can on the newspaper so that it hangs over the edge of the folded side (over the flap). Wrap the newspaper around the can until it overlaps itself.


img_9714

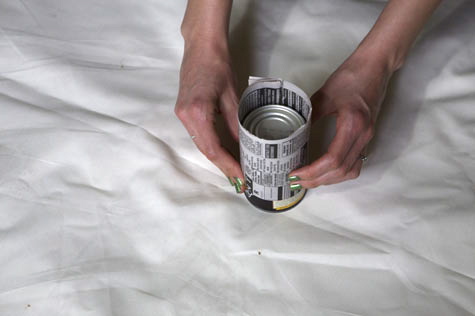
Keeping your fingers on the seam to prevent it unwrapping, turn the can on it’s end.


img_9717

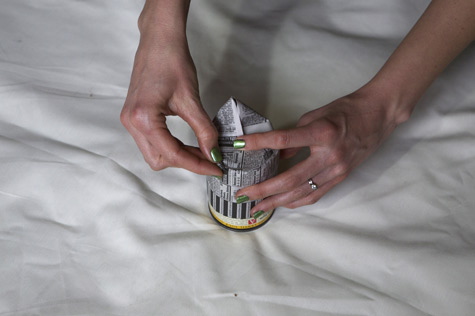
Continuing to hold the seam with one hand, begin folding down the excess newspaper to create a bottom. I usually fold it down in four flaps.  It may take a few tries to master this part, but eventually you will be able to get a flat, solid bottom.


img_9719

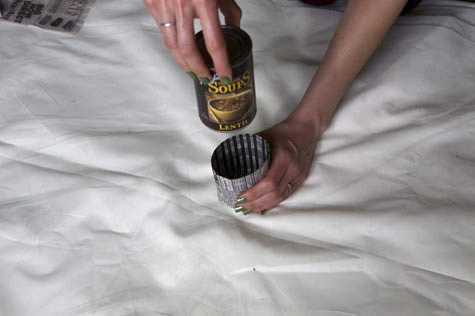
Flip the can over and carefully wiggle it out of the newspaper pot. Don’t forget to keep holding that seam!


img_9721

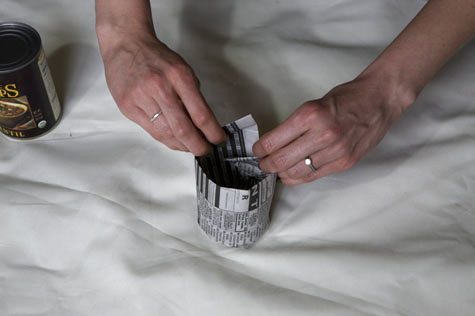
Now, where the newspaper overlaps itself, one end will be on the ‘outside’ and one end will be on the ‘inside’. On the ‘outside’ piece, gently lift that one-inch flap up.


img_9723

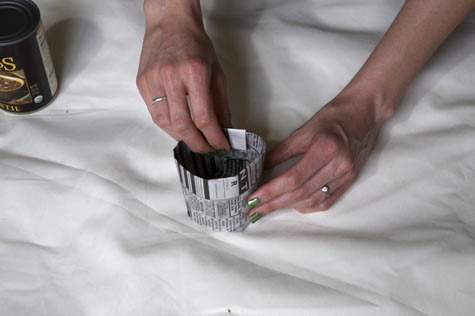
Fold the ‘inside’ end under the flap, and tighten up that seam.


img_9724

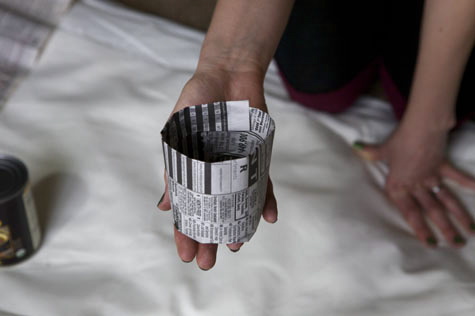
Voilà! She is a seed pot!


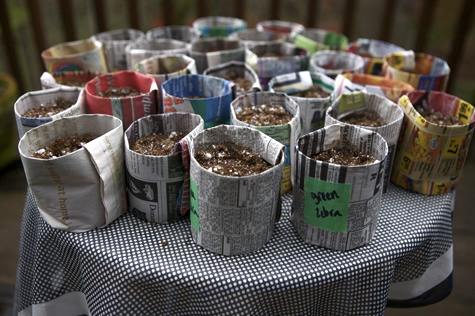
That’s all there is to it!   Just start your seeds as normal in their individual pots. Don’t forget to label them (I used green tape and a sharpie), and make sure to open up the bottoms before you put them in the ground, to allow their roots to extend.
 

img_9745


Happy gardening!

sign-off

  • Alex

    This is an awesome idea! Think we’ll try this here. The only thing I’d worry about is what sort of newspaper ink is leaching into the ground (especially if you’re growing food), but as it turns out most are not too too bad. I’d say go for papers that use soy-based inks, if possible.

  • http://bonzaiaphrodite.com Sayward

    @ Alex – yeah I thought about that, but I know plenty of gardeners who use shredded newspaper as mulch or compost. I’m sure it’s quite safe. =)

  • hayley

    i love this idea. i’m going to do it with my students monday!

  • http://autumntakesme.blogspot.com princessjen003

    what a cute idea!

    i followed your link from the LJ post you made.

  • http://bonzaiaphrodite.com Sayward

    @ Hayley – Let me know how it turns out, yeah?

    @ Princessjen003 – Welcome! Glad you like it. =)

  • http://mmpd.com.au/ roycecedric

    Good article. Not only do newspapers need to grow online attention, but the revenue stream has to grow exponentially. So there is a drop in daily paper delivery.

  • http://bonzaiaphrodite.com Sayward

    @ roycecedric – I think your little bot is confused, no? ;)

  • Kristin

    I tried this at home, and although my little pots aren’t quite as artistic as yours, I know they will perform admirably! Thank you so much for this post. Now I know what to do with my extra newspapers. :)

  • http://bonzaiaphrodite.com Sayward

    @ Kristin – They don’t need to be cute as long as they’re functioning – and I’m sure yours will do their duty. =) Where do you live that you’re planting this early? I’m jealous!!

  • http://andsowmygardengrows.blogspot.com/ Sarah

    What a great idea! I especially like the how to with pictures. Looking forward to trying this! Thanks.

    Nor Cal

  • http://andsowmygardengrows.blogspot.com/ Sarah

    Love the how to pictures! Great idea and frugal and earth friendly…can’t go wrong there!

  • http://hippieingeeksclothing.wordpress.com/ Angela

    I have a little gadget for doing this. Never thought to use a soup can. Oh well. I take the little thing to school and let the kidlets use it; they think it’s great fun. I wish my crocus were blooming as yours are now; we just got two inches of fresh snow. :(

  • http://bonzaiaphrodite.com Sayward

    @ Sarah – Thanks!

    @ Angela – It’s such a great kids project! Can’t wait to do it with my own little wee one. =)

  • Tina

    wow! this is such a good idea! I usually just go to my local store and get the biodegradable little jiffy-seed starters, but this saves money and is just as good. can’t wait to see how it works out.

  • http://www.margaritastewart.blogspot.com Shannon

    I love it! I saw a tool for this once and wanted it..I will want no more!!! I featured you on my blogs facebook page today!!!
    http://www.facebook.com/margaritastewart

  • http://bonzaiaphrodite.com Sayward

    @ Shannon – Yay, so glad you like it. And thanks for the link!

  • Hannah

    I love the idea! I tried it out but it didn’t work so well…… lol XD

  • Annie

    My “gardening guru” has a wooden device (ordered from a gardening catalog)–the process is the same, but the dowel is carved with a disc on the bottom to smash the pot’s bottom more securely. Have you ever seen one?

  • http://bonzaiaphrodite.com Sayward

    @ Hannah – Practice makes perfect!

    @ Annie – Haven’t seen that. Does it make a huge difference?

  • rebecca

    great how-to. thanks.
    should we make holes in the bottom of the pot? i thought seed starter pots had to have holes at the bottom.

    also, is the newspaper ink bad for you if you’re growing vegetables? does it get into the soil and into the vegetables that you’ll eat?

  • http://bonzaiaphrodite.com Sayward

    @ rebecca – You don’t need to make holes because the water will just soak right through the newspaper (holes are usually to ensure proper drainage)

    As far as I understand, the ink does not harm you. Newspapers have been used in gardens for ages (as compost, as ground cover, etc), so I’m pretty confident that it’s safe. That said, I haven’t seen any actual studies.

    Anyone have more info on this?

  • http://www.amyemiller.typepad.com Amy Miller

    I love this idea!! I added the idea as a feature on my blog: http://www.amyemiller.typepad.com to share on Earth Day!! Keep up the great work, I hope to have chickens one day too.

  • http://bonzaiaphrodite.com Sayward

    @ Amy Miller – Thanks for the add and link! Your blog is adorable – I love the book spine book marks!

  • Jenny

    I was exploring etsy this morning, and found this: http://www.etsy.com/listing/46249463/20-recycled-biodegradable-seedling?ref=storque

    I just want to thank you because you’re amazing and are so willing to share your ideas (instead of selling them)!

  • http://bonzaiaphrodite.com Sayward

    @ Jenny – Wow that’s crazy! I guess convenience goes a long way.

    And thanks. But I have to say, please don’t hate me if/when I begin selling things on Bonzai. A girl’s gotta eat! (and I think I’ve got quality goods to offer) . . .

  • Pat

    Sayward, these are amazing! I just wanted to thank you for the idea, my sister and myself both used them, we BTW live in europe, and I thought you might like to know that even out here we love your blog!

  • Anne

    Yours look great – I’m sure I need some practice, but I can’t seem to get them to stay together. The last step of securing the outside flap over the inside piece doesn’t want to hold. Any tips?

  • http://bonzaiaphrodite.com Sayward

    @ Anne – Are you folding over enough? Maybe you’re trying to make them too tall? Make sure that fold is nice and wide. It should stay together better once there’s dirt in there, too.

    Luck!

  • April C.

    This is great! I just made a bunch of these today, filled with soil and seed and set them out in the sun. Can’t wait to see my little plants poking through.

    About the ink, I used some flyers from a local grocery store and “made from soy ink” was printed on the bottom of each page.

  • Barbara

    I had a go at making these today with my kids – lots of fun!

    What I found helped was to do it as a two stage process, and after wrapping the paper around the can, take the can out and fit the collar then put the can back in and fold the bottom.

    Doing it this way means I could get my hand up inside the newspaper cylinder which made fitting the collar easier.

    Unfortunately I didn’t think through the requirements for labelling them and just used one of the kids’ washable markers… oops!

  • Pingback: Gardening for the Unenlightened | Pioneer In The Suburbs

  • CarolinaGirl

    Thank you so much for posting this! It is perfect and I plan to make these next week! I still take the paper, only for the coupons :) but I do read it on occasion.

  • Anonymous

    This is amazing! I was just crying on the inside about having to spend money on little pots, but this is the perfect solution + a great homeschool project for me and the kids! Thank you!

  • grandmanaenae

    I can’t wait to try this…this is a wonderful idea thanks so much for sharing!

  • Mamockler

    You can also use toilet paper rolls. Just stuff the bottom with a small amount of newspaper to soil in. Put the whole thing in pots or ground later when plant is big enough.

  • Pingback: Seed Starters « Oddments and Endments

  • Dennie

    I’ve heard that you would want to stay away from the colored pictures and inks. So just use the ‘black only’ pages.

  • Andrea Ostendorf

    I found a few different tutorials for newspaper seed pots and yours was the winner! I Just finished planting mine and did a blog post on the process if you would like to check it out. :) Thanks!
    http://puglife85.blogspot.com/2012/03/diy-newspaper-seed-pots.html

  • http://www.indybloggirl.com/ Rebeccahgl

    This may seem like a silly question but will they hold up to keeping the soil wet long enough to get starts large enough to plant (4-6 weeks)?

  • http://bonzaiaphrodite.com/ Sayward Rebhal

    They dry pretty quickly and last a long time – they don’t degrade much.

  • Kindergartenloves

    These directions are awesome.

  • Wendyjane

    Thanks for the great idea. I have tried toilet paper inner tube , but it is small and has no base, this will be much better.

  • Pingback: DIY: Newspaper Seed Pots | This Pug Life

  • Rich

    Are you able to plant the entire newspaper pot when it’s ready to go outdoors?

  • http://bonzaiaphrodite.com/ Sayward Rebhal

    Yes! Just unfold the bottom part so the roots have a place to go. ;-)

  • Pingback: Spring is at the front door! | Provident Home Companion

  • Pingback: Planning the garden: Starting seeds | Provident Home Companion

  • Pingback: Upcoming Project: Seed Pots « Tending Our Common Ground

  • Pingback: Newspaper Pots | Blackberry Burrow

  • Pingback: Easy DIY Sustainable Seedlings for Veggie & Herb Gardens